Author Archives: Dávid

Deploying python function as Lambda with API Gateway

Goal of this exercise is to put our previously developed python function behind a REST API.

Tools/prerequisites we are going to use: Visual Studio Code, NPM, python 3, AWS account, AWS credentials configured locally.

GitRepo is available here.

Api Gateways are important infrastructure elements, as a simple Lambda function is only available from inside AWS ecosystem. REST Api is a common, easy to implement standard to share resource.

To make our Lambda function publicly available we are going to update our previous code base with two things: tell the serverless to create the Api Gateway for our stack and upgrade the response of our utc-time-teller.

Let’s start with the python code changes. As we are going to communicate on HTTP channel JSON is a good model structure to respond with. Edit our handler’s code as following:

import datetime
import json

def handler(event, context) -> str:
    dt = datetime.datetime.now(datetime.timezone.utc)
    utc_time = dt.replace(tzinfo=datetime.timezone.utc)

    return {
        "statusCode": 200,
        "headers": {
            "Content-Type": "application/json"
        },
        "body": json.dumps({
            "utc ": str(utc_time)
        })
    }

We are returning a default HTTP response with statusCode of 200 (everything is OK), telling the receiver that the message is in JSON format (“Content-Type”: “application/json”) and of course adding the body itself.

The Lambda is still testable using the previously shown method:

We can continue with the serverless.yml:

Add these few lines to the end of our function:

    events:
      - http:
          path: /{proxy+}
          method: any
      - http:
          path: /
          method: any

This will generate the API Gateway on AWS. The whole serverless.yml looks like this:

service: BlogDavidPythonLambdaDeploy

provider:
  name: aws
  region: eu-west-1

functions:
  utc-time-teller:
    name: utc-time-teller
    handler: src/lambda_handler.handler
    memorySize: 128
    timeout: 30
    runtime: python3.8
    events:
      - http:
          path: /{proxy+}
          method: any
      - http:
          path: /
          method: any

Now call our deployment script from a command line tool:

serverless deploy

Serverless CLI should add new lines to the logs under the category “endpoints”. Copy the one without {proxy+} ending to the browser and enjoy our newly created API gateway response:

Tool to generate models from JSON

When we are integrating with a new REST API, mostly the request and response objects are defined using JSON and we need to convert them to our programming language models. Depending on the complexity of the communication it can be a huge job, just to type them and it is really easy to make typos.

There are plenty of tools on the internet to solve this problem, but I want to highlight one of my favourites: quicktype.

Quicktype supports many language outputs, including but not only:
– C#
– Kotlin
– Javascript
– Java
– Python
– Ruby
– etc

It’s online tool is totally enough for converting few models:

But their command line tool is quite powerful to handle multiple JSON files:

npm install -g quicktype
echo '[1, 2, 3.14]' | quicktype --lang go

Furthermore the tool’s code is available on Github. Sadly, as I can see, it is not heavily maintained anymore.

Disclaimer: this wasn’t a paid promotion, I don’t even know the developers, just like their product.

Create, write, read text file using C#

Goal of this post is to show a quick way to handle text files in C#.

Tool/prerequisites we are going to use: Visual Studio, .NET 6.

GitRepo is available here.

With C# it is pretty straightforward to create, write and read text files:

using System;
using System.IO;

namespace BlogDavid_FileCreateWriteRead
{
    internal class Program
    {
        static void Main(string[] args)
        {
            // Keep info of file in memory
            var fileInfo = new FileInfo("./a.txt");
            // Create the file, then create a stream writer, which is easily used to add text
            using (var fileStream = fileInfo.Create())
            using (var streamWriter = new StreamWriter(fileStream))
            {
                streamWriter.WriteLine("Test data!");
            }
            // StreamReader is a great tool to read text from file
            using (var streamReader = new StreamReader(fileInfo.FullName))
            {
                Console.WriteLine(streamReader.ReadToEnd());
            }

            // Don't let console to close, wait for one char
            Console.ReadKey();
        }
    }
}

Running the above code we will get this result:

Change between local AWS profile

We can store AWS profile data in a configuration file under C:\Users\{userName}\.aws\credentials like following:

[profile1]
aws_access_key_id=x
aws_secret_access_key=y
region=eu-west-1
aws_region=eu-west-1

[profil2]
aws_access_key_id=xy
aws_secret_access_key=zk
region=eu-west-1
aws_region=eu-west-1

We can easily rotate between them using the following command:

setx AWS_PROFILE profil1

To see which profile is currently selected use this code:

aws configure list

Note: As the above logic uses environment variable to save and read the currently selected profile, we need to restart applications to the update take effect.

Deploying python function to AWS Lambda using serverless

Goal of this exercise is to show how easy it is to deploy our python code to AWS.

Tools/prerequisites we are going to use: Visual Studio Code, NPM, python 3, AWS account, AWS credentials configured locally.

GitRepo is available here.

Serverless is a great tool to have the production code and required cloud computing configuration next to each other. To install serverless, use the following command in your favorite shell:

Note: you will need “npm” installed

npm install serverless -g

Create your folder structure for the project: we are going to need one python file, which will be the host of called function and add a file called serverless.yml, for configuration.

Basic project structure

Let’s start with the python file:

import datetime

def handler(event, context) -> str:
    dt = datetime.datetime.now(datetime.timezone.utc)
    utc_time = dt.replace(tzinfo=datetime.timezone.utc)

    return str(utc_time)

It is a pretty simple code, which will return the UTC time formatted to string. Which we need to note is the two parameters of our function: event and context, both of them will be added by AWS. As in this exercise we don’t care about input parameters, just add them to our function.

Go to the serverless.yml and add these lines:

service: BlogDavidPythonLambdaDeploy

provider:
  name: aws
  region: eu-west-1

functions:
  utc-time-teller:
    name: utc-time-teller
    handler: src/lambda_handler.handler
    memorySize: 128
    timeout: 30
    runtime: python3.8

service: is the name of the group.
provider: configuration of cloud computing platform.
name: which cloud computing platform we are using.
region: AWS’ regions are available here.
functions: in the use case of AWS, functions are the Lambdas.
“utc-time-teller”: the identifier of our Lambda.
name: how the function will be named on AWS.
handler: path to our function in the form: path/file.functionName
memorySize: how large lambda we are planning to use. Measured in MB-s. Further details and prices can be found here.
timeout: maximum processing time, measured in seconds.
runtime: container type definition with the needed prerequisites like installed python3.8. Further AWS runtimes can be found here.

If we are done with our files, open up a command line tool and call this command:

serverless deploy

Serverless will pack our code and create the stack on AWS. After it finishes, go to AWS Console and in the search bar look for “lambda”:

Search for the name of our lambda “utc-time-teller”:

Click on it and navigate to the “Test” tab, then hit the “Test” button:

If everything went alright, we can see the result of our Lambda:

Zip files with .NET Core

GitRepo is available here.

Note: this post is heavily based on this StackOverflow answer.

Zipping files in .NET core is pretty simple and can be done in memory:

public static void ZipMultipleFiles(IEnumerable<FileInfo> files, string zipPath)
        {
            using (var archiveStream = new MemoryStream())
            {
                using (var archive = new ZipArchive(archiveStream, ZipArchiveMode.Create, true))
                {
                    // iterating through files, if doesn't exists, skip that file
                    foreach (var file in files)
                    {
                        if (!file.Exists)
                            continue;

                        // creating place for the file in the zip
                        var zipArchiveEntry = archive.CreateEntry(file.Name, CompressionLevel.Fastest);

                        using (var zipStream = zipArchiveEntry.Open())
                        using (var fileStream = new FileStream(file.FullName, FileMode.Open, FileAccess.Read, FileShare.ReadWrite))
                            // copying the file's content into the zip
                            fileStream.CopyTo(zipStream);
                    }
                }
                // stream needs to be seeked back to the beginning
                archiveStream.Seek(0, SeekOrigin.Begin);

                // writing the whole zip to a new file
                var zipFile = new FileInfo(zipPath);
                using (var fileStream = zipFile.Create())
                    archiveStream.CopyTo(fileStream);
            }
        }

Edit multiple lines in Visual Studio Code

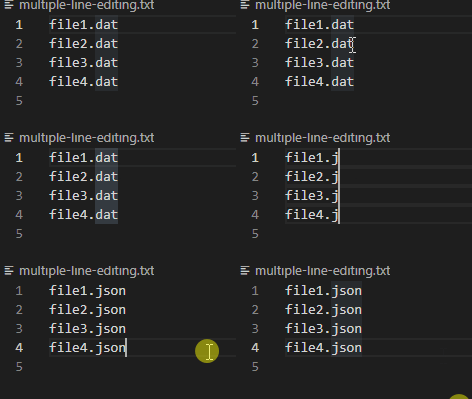
You have a file with multiple lines and you want to edit the same character place in every line simultaneously.

Imagine your file has file names as rows and you want to edit their extensions from dat to json:

file1.dat
file2.dat
file3.dat
file4.dat

In Visual Studio Code go to the first line, place the cursor between the dot and ‘d’, then hit CTRL+SHIFT+ALT all together and keep them down. Using the downward arrow move the cursor down on all the lines. When all lines are having the same cursor, edit the rows as you wish:

Note: some other editors need only SHIFT+ALT (without CTRL) to edit multiple lines

Where are the AWS settings stored on Windows?

Two main places to put your AWS credentials are environment variables and AWS’ config file.

Environment variables

In the Windows search type in “environment variables” hit Enter:

Hit “Environment Variables” button and under “User variables for xy” add these two keys: AWS_ACCESS_KEY_ID and AWS_SECRET_ACCESS_KEY, values should be copied from AWS’ console.

Config file

Create a folder under the following path:

C:\Users\{YourUserName}\.aws

Add a file name credentials (without extension)

Write in the configuration as following:

[default]
aws_access_key_id={your_aws_access_key_id}
aws_secret_access_key={your_aws_secret_access_key}

Mount Windows folder to WSL – Ubuntu

Windows Subsystem for Linux (WSL) is a great tool to virtualize Linux distributions on Windows. Common need is to share files between the two systems. Easiest way is to mount a Windows folder to the Linux subsystem.

Using the following code lines we are going to make Windows’ folder under path “c:/shared” available for Ubuntu on the path “/mnt/path_on_linux”.

Start up WSL command line tool and create the folder:

sudo mkdir /mnt/path_on_linux

Note: mkdir is the command to create folder

Note: sudo gives administrative rights to the command, it might ask for your admin password

Now mount up our Windows folder to WSL:

sudo mount -t drvfs c:/shared /mnt/path_on_linux

Console App template from C# version 6

When you create a new project, starting with C# version 6, you will see the following Program.cs:

// See https://aka.ms/new-console-template for more information
Console.WriteLine("Hello, World!");

It could be scary for some people: no static Main entrypoint, no namespace, no usings. Actually the above template, as mentioned on the commented url above, is translated to this:

using System;

namespace BlogMainTemplate
{
    internal class Program
    {
        static void Main(string[] args)
        {
            Console.WriteLine("Hello World!");
        }
    }
}

If you like the old template more, you can just copy it to your Program.cs without any issues.